CT IDX Pro+

32 min read Documentation

Our CT IDX Pro+ WordPress plugin offers MLS data coverage across all 50 states. That’s 650+ MLS Markets and we’re adding more all the time. It’s a direct plug-and-play IDX, with automatic site integration, giving you a beautifully designed cohesively branded website from end to end.

It also includes saved searches & alerts with email and SMS, favorite listings, compare listings, and recently viewed listings all packaged with CT IDX Pro+, making it an all-encompassing plugin that you can use on any WordPress website.

This guide is here to help you understand the process and configuration of the CT IDX Pro+ plugin, ensuring you efficient integration of MLS data into your website.

If you’re a legacy customer of CT IDX Pro and have an active license open a live chat with us to discuss upgrading to CT IDX Pro+.

Step-by-Step Process for CT IDX Pro+ Plugin Integration

  1. After Purchase & Receiving Initial Paperwork:
    • After you complete your purchase, we will send over paperwork or instructions depending on your MLS board in a separate email.
  2. Submission and Approval Waiting Period:
    • After you return the paperwork, we’ll submit your information to the local MLS office for approval.
    • Please allow 5-7 business days for this process; the duration can vary based on the office’s workload.
  3. Post-Approval – Setting up Your Plugin:
    • Upon receiving MLS approval, we will reach out to you via email for your WordPress admin login details to access your site.
  4. Plugin Installation:
    • Our team will then proceed with the installation of the CT IDX Pro+ plugin on your WordPress site.
    • This typically happens the same day as receiving your site’s admin details.
  5. Completion and Confirmation:
    • After the successful setup, we will notify you via a confirmation email that your site is now equipped with the CT IDX Pro+ plugin and is ready for use.

Plugin Requirements

  • PHP 8.0 or greater

Plugin Install

Although we handle the initial installation of CT IDX Pro+, the following is for reference.

  1. Login to your WordPress Admin
  2. Go to Plugins > Add New
  3. Upload the zip file you downloaded from your Account Dashboard > Downloads panel
  4. Activate the plugin

Plugin License

  1. Login to your Account Dashboard
  2. Go to License Keys > find CT IDX Pro+
  3. Copy your License Key
  4. Navigate back to your site’s admin > Settings > CT IDX Pro+
  5. Paste your License Key > Save Changes
  6. Click Activate License

Staging Sites License Usage

Staging websites are permitted under the following conditions:

We fully support staging environments offered by several popular hosting services in the WordPress ecosystem. Below is a list of hosting providers that provide custom staging environments:

  • Cloudways (Recommended Hosting Provider)
  • WP Engine
  • InstaWP
  • Kinsta
  • GoDaddy
  • FlyWheel
  • BlueHost
  • HostGator
  • SiteGround

If your hosting provider is not listed, they may use a standard method for creating staging sites. In such cases, our Standard Detection rules will apply without the need for custom rules.

Standard Staging Environments

For hosting providers that do not offer a tool to create staging environments or use a typical URL structure, we support the following subdomain patterns as valid staging site URLs under your license:

  • *.staging.example.org
  • *.test.example.org
  • staging-*.example.org
  • dev.example.org

These patterns ensure your staging sites are covered under the CT IDX Pro+ license when using common subdomain conventions.

You’ll use Appearance > Menus to build out your navigation. More on the Menus screen can be found here.

Examples:

  • All Listings or “Find A Home”:
    https://yourdomain.com/property-search/listings
  • Active & San Diego:
    https://yourdomain.com/property-search/listings?zip=92101&statuses=active
  • Coming Soon:
    https://yourdomain.com/property-search/listings?statuses=coming-soon
  • Has Pool:
    https://yourdomain.com/property-search/listings?pool=true
  • 3 Beds:
    https://yourdomain.com/property-search/listings?minBedrooms=3
  • Active, La Jolla, 2+ Beds, $500k to $650k:
    https://yourdomain.com/property-search/listings?statuses=active&zip=92037&minBedrooms=2&minPrice=500000&maxPrice=650000

Quickly & Easily Build URLs

To quickly & easily build out URLs, do the following:

  1. Go to the front end of your site and do a physical search for what you want
  2. Copy the URL
  3. Add that URL to your menu item, button, link, etc…Or, share them with your leads via email, social media, messaging apps, etc…

Tip: To share custom-drawn areas with your leads, start by searching and using the draw function. Afterward, simply copy the URL and share it with them.

Settings

We handle the initial install of the CT IDX Pro+ plugin, but there are a few settings that you’ll need to configure.

  1. Login to your WordPress Admin
  2. Go to Settings > CT IDX Pro+

General

  • License Key
    This is the key that controls the licensing of the plugin. If this is removed or goes invalid for any reason the IDX plugin and all of its features are disabled. Enter your key and click Activate License.
  • IDX API Key
    Pre-set for connectivity to IDX data, requiring no modifications.
  • Domain
    Enter the site domain assigned to your IDX account (e.g. yoursite.com). This reflects your website’s domain name.
  • MLS IDs
    Add each MLS ID and press Enter to confirm. These are the MLS board identifiers used to pull listings. Pre-set values require no adjustments in most cases.
  • Offices
    Configure one or more office UIDs and their associated MLS IDs for listing searches. Click + Add Office to create an entry. Each office has three fields:

    • Office Name: A display label for this office (e.g. “Main Office”).
    • Office UID: The unique identifier assigned to your office in the MLS (e.g. OFFICE123).
    • MLS IDs: Comma-separated MLS IDs associated with this specific office. Add each ID and press Enter to confirm.
  • Global Assigned User
    The WordPress user shown as the contact agent on all listings by default. Select a user (administrators, brokers, and agents are available) to display their name, contact information, and profile picture alongside every IDX listing. More on that in the Agents section of the documentation.

    If you’re running a brokerage site with multiple agents, use + Add Office Override to configure per-office agent display behavior. Each office override has two fields:

    • Office UID: The office UID this override applies to.
    • Agent Information Display: How to display agent info for listings from this office. Choose from:
      • Display Global Assigned User Information (default): Displays the information of the globally assigned user.
      • Display Agent Information from MLS: Retrieves and displays agent information directly from the MLS.
      • Display Agent Information from WordPress Users: Matches agents’ license numbers with those from the MLS and displays the corresponding information from their WordPress user profile—more on that in Agents.
  • MLS Compliance
    Enable extended MLS compliance information if required by your MLS board. This displays additional agent and office details on listing pages to meet specific MLS requirements.
  • Property Types
    Select any property types that should be hidden from the search filter options. Checked types will not appear as filter choices for site visitors. Available types: Single Family Home, Condo, Townhouse, Duplex, Triplex, Rancho, Multi-Family, Mobile/Manufactured, Land, Commercial, Lease, Other.
  • Show Only Office Listings
    When enabled, search results will only display listings from your configured office/brokerage. No general MLS data will be shown.
  • Max Map Results
    Control the maximum number of listings displayed on map views using the range slider (50–500). Higher numbers provide better clustering accuracy but may impact performance. Recommended: 200.
  • Custom Office Markers
    Enable custom SVG map markers to visually distinguish your office’s listings from other listings on map views. When enabled, upload a custom SVG icon (recommended size: 36×36px) that will replace the standard price markers for listings from your configured office UIDs.

Style

  • Corner Style
    Choose between Rounded Corners and Square Corners for all frontend components, including property cards, buttons, inputs, badges, modals, and other UI elements, making it easy to match your site’s design.
  • Primary Color
    Use this to change the plugin’s default blue (buttons, links, and interactive elements) to match your site’s branding. This color is also used to suggest matching badge styles in the Status Badge section.
  • Status Badge
    Customize the appearance of status badges displayed on property listings. A live preview shows exactly how badges will look. Choose from two style modes:

    • Presets: Select from suggested styles based on your primary color (Primary, Refined, Accent, Muted) or standard color options (Teal, Blue, Green, Red, Orange, Dark). Brand color suggestions appear automatically when a Primary Color is set.
    • Custom: Define your own background and text colors using the color pickers. A contrast warning will appear if the combination is hard to read, with an Auto-Fix button to automatically correct the text color for accessibility.

    All status badges across your site will use the same selected style. Use Reset to Default to clear any custom color and return to the default.

Login / Register

  • Login Redirect
    Choose where users land after logging in. Select Current Page (default) to keep them on the page they were on, or Specific Page to choose a destination page from your site.
  • Registration Redirect
    Choose where users land after registering. Select Current Page (default) or Specific Page to choose a destination page from your site.
  • Forced Registration
    Optionally enable forced registration by toggling Enable Forced Registration. When enabled, visitors will be prompted to register after reaching the configured number of listing detail views. Set the Number of Listing Views allowed before the prompt appears.
  • Terms & Conditions
    Select the page that contains your terms and conditions. When a page is set, a checkbox will appear on the registration form requiring users to agree before completing registration.

Forms

  • Schedule a Tour
    Toggle to enable or disable the Schedule a Tour form on listing detail pages.
  • Request Info
    Toggle to enable or disable the Request Info form on listing detail pages.
  • Success Message
    The message displayed to users after the Request Info or Schedule a Tour form is successfully submitted.

Emails

The following settings apply to the listing alert emails and outgoing notifications.

The Listing Detail > Schedule Tour & Request Information forms will be sent to the Global Assigned User as default. If you have our CRM plugin activated (Contempo Leads Pro) the forms act as lead magnets that feed leads into the system, reference How Leads Are Collected. If you’d like normal emails to be sent you can deactivate the Contempo Leads Pro plugin and all forms will automatically act in the normal fashion.

  • Email Logo
    The logo image displayed at the top of outgoing emails to your leads. Click Select or Upload to choose an image from your media library.
  • From Name
    The sender name shown in email clients. Should be your name or your office’s name. Defaults to your site name if left empty.
  • From Email
    This will act as both the “From” and “Reply-To” address on outgoing emails. Defaults to the WordPress admin email if left empty.
  • Header
    The text displayed in the header of your new listing alert emails. (HTML Allowed: h1–h6, p, a, strong, em, br, img)
  • Footer
    The text displayed in the footer of your new listing alert emails. (HTML Allowed: h1–h6, p, a, strong, em, br, img)
  • Company Info
    Your company name, address, and copyright line displayed in the email footer. (HTML Allowed: h1–h6, p, a, strong, em, br, img)

Agent Profiles

Create comprehensive agent profile pages with automatic URL generation, customizable agent directories, and detailed profile information.

  • Enable Automatic Agent Profile Pages
    Toggle to activate the agent profile system. When enabled, automatic profile pages will be created for selected agents with their own unique URLs.
  • Agent Selection
    Choose which WordPress users (agents, brokers, administrators) should have automatic profile pages. Only selected users will appear in the agent directory. Use the Select All or Deselect All buttons for quick configuration.
  • URL Configuration
    • Single Agent Profile URL Slug: Customize the URL structure for individual agent pages (e.g., /agent/john-smith). URLs are automatically generated from each user’s first and last name in their WordPress profile.
    • Enable Agent Archive/Directory Page: Toggle to create a searchable directory page listing all selected agents.
    • Agent Archive URL Slug: Set the URL for your agent directory page (e.g., /agents).

    Important: After changing URL slugs, visit Settings → Permalinks in WordPress to refresh the rewrite rules if pages don’t load correctly.

  • Agent Archive Settings (when archive is enabled)
    • Archive Page Title: The main heading shown on the agent archive page (e.g., “Our Team”).
    • Archive Page Subtitle: The subheading shown below the title (e.g., “Meet our experienced real estate professionals”).
    • Enable Hero Banner: Display a hero banner section at the top of the archive page with an optional background image.
    • Enable Search: Allow visitors to search agents with intelligent typeahead suggestions for names, specialties, areas, languages, and certifications.
    • Enable Pagination: Display agents across multiple pages instead of loading all at once. Configure how many agents to show per page (6–50).
    • Only Show Agents with Active Listings: Hide agents who don’t currently have any active listings in the directory.
  • Agent Profile Settings
    • Hero Banner Image: Choose whether to use listing images from the agent’s current/past listings, or set a default fallback image.
    • Display Options: Control what information appears on agent profiles including profile images, social media links, office information, specialties, certifications, areas served, and languages spoken.
    • Badge Colors: Choose how badge colors are applied to specialties, areas served, languages, and certifications:
      • Multi-colored (Default): Each category gets a distinct color.
      • Monochromatic: All badges use gray.
      • Primary Brand Color: Uses your primary color from the Style tab.
      • Custom Colors: Pick individual colors for each badge category.
    • Listings Per Page: Number of listings to display on each agent profile page (1–50).

Integrations

  • Google Maps
    Your Google Maps API key for property maps and location features. For setup instructions see our Google Maps documentation.
  • What’s Nearby (Yelp)
    Display nearby points of interest powered by Yelp on listing detail pages. Get your credentials at Yelp Developers.

    • Yelp Client ID: Your Yelp application client ID.
    • Yelp API Key: Your Yelp application API key.
    • Business Types: Select up to 4 category types to display on listing pages. Available types include Banks, Bars, Coffee Shop, Convenience Stores, Gas Stations, Grocery, Hospitals, Park, Pet Store, Restaurants, Education, Shopping Malls, Transit Stations, and Veterinary Care.
  • WalkScore
    Enable WalkScore data to display walkability, transit, and bike scores on listing detail pages. Toggle Enable WalkScore to activate, then enter your WalkScore API key. For setup details, refer to the WalkScore documentation.
  • Google reCAPTCHA
    Protect your lead forms with Google reCAPTCHA v2 spam protection. Toggle Enable reCAPTCHA to activate, then enter your keys. To get your keys, register your site with Google reCAPTCHA and choose reCAPTCHA v2. This will give you:

    • Site Key: The public key used in the frontend form.
    • Secret Key: The private key used for server-side verification.
  • Google Analytics (GA4)
    Send property view and interaction events to Google Analytics 4. Toggle Enable GA4 Tracking to activate, then enter your Measurement ID (format: G-XXXXXXXXXX). The following events are automatically tracked: property views (includes listing ID), property searches (includes search query), favorite actions (includes listing ID and action type: add/remove/toggle), form submissions (includes form type and listing ID), and saved searches (includes search query).
    To learn how to set this up, check out our full guide: Tracking IDX Leads with Google Analytics (GA4).
  • Zapier
    Trigger Zapier workflows when new leads are submitted. Toggle Enable Zapier Webhooks to activate, then paste in your Webhook URL.

    1. Log into your Zapier account and create a new Zap
    2. For the trigger, select “Webhooks by Zapier”
    3. For the event, select “Catch Hook”
    4. Click Continue twice until you get to “Your Webhook URL” — copy it
    5. Go to your WordPress Admin > Settings > CT IDX Pro+ > Integrations > paste into Webhook URL > Save Settings
    6. Go back to Zapier > click Test Trigger, confirm you see the data you just submitted
    7. Continue to set up your Action and finalize your new Zap
  • Follow Up Boss
    Directly sync user registrations, forms, and lead activity to your Follow Up Boss CRM account. Toggle Enable Follow Up Boss to activate, then enter your credentials.

    1. Login to your WordPress Admin
    2. Go to Settings > CT IDX Pro+ > Integrations
    3. Toggle Enable Follow Up Boss on
    4. To generate your API Key please see this article — copy and paste it into the API Key field
    5. To get your Pixel Code please see this article — paste the full code into the Pixel Code area
  • Twilio / SMS
    Send SMS notifications to leads via Twilio. Toggle Enable SMS Alerts to activate, then enter your Twilio credentials.

    • Account SID: Your Twilio Account SID — a unique identifier for your Twilio account.
    • Auth Token: The authentication token from your Twilio account, used alongside the SID for secure API communication.
    • From Number: The Twilio phone number that will appear as the sender on outgoing SMS messages (format: +15551234567).

Pages

The CT IDX Pro+ plugin introduces several essential pages to enhance the user experience on your real estate website. These pages allow users to access various features such as viewing recently viewed properties, managing favorite listings, and setting up saved searches and alerts. Here’s an overview of these pages:

It’s important to note that these pages are exclusive to logged-in / registered users.

Profile

This page allows the user to view and manage their personal information and change their password.

URL: /my/profile

Recently Viewed

This page displays a list of properties that a user has recently viewed on your website. It’s a convenient way for users to revisit properties they are interested in without having to search for them again.

URL: /my/recently-viewed

Favorite Listings

Users can save their favorite listings on this page for easy access. It serves as a personalized space where users can keep track of the properties they are most interested in.

URL: /my/favorite-listings

Saved Searches & Alerts

This page allows users to view and manage their saved searches. Users can also set up alerts to receive email or SMS notifications when new listings match their search criteria, ensuring they don’t miss out on potential properties.

URL: /my/saved-searches

Compare Listings

The Compare Listings feature isn’t accessed through a direct URL. Instead, users utilize it through the Favorite Listings page. Here’s how it works:

  • On the Favorite Listings page (/my/favorite-listings), users can select up to five listings they are interested in by checking the “Compare” box next to each listing.
  • After selecting the desired listings, users can click on the “Compare” button.
  • This action redirects them to a comparison page where the chosen listings are displayed side by side, facilitating an easy comparison of features, prices, and other essential details.

URL: Not directly accessible, but integrated with Favorite Listings

Elementor Widgets

All of the available widgets are under the “CT IDX Pro+” section.

This widget allows you to choose from a Single Field (with typeahead) or Multi (typeahead, price, beds, baths, property type, more…).

CT IDX Listings Grid

This widget allows you to display a grid of listings based on your chosen parameters.

To show an individual agent’s listings you select the office under “Data”, then enter the agent’s license number (screenshot). This option only works for agents under your approved & connected office.

This widget allows you to display a carousel of listings based on your chosen parameters.

To show an individual agent’s listings you select the office under “Data”, then enter the agent’s license number (screenshot). This option only works for agents under your approved & connected office.

CT IDX Listings Map

This widget allows you to display a map of listings based on your chosen parameters.

To show an individual agent’s listings you select the office under “Data”, then enter the agent’s license number (screenshot). This option only works for agents under your approved & connected office.

CT IDX Listings Counter

This widget allows you to display an animated count of listings based on your chosen parameters—without showing the listings themselves. It’s perfect for call-to-action sections, homepage stats, market overviews, or agent profiles.

To show an individual agent’s listing count you select the office under “Data”, then enter the agent’s license number (screenshot). This option only works for agents under your approved & connected office.

CT IDX Item Grids

This widget allows you to display beautiful grids of neighborhood or property type data from the MLS in layouts of 2, 3, 4, 6, and 8, with background image upload.

Shortcodes

Profile

This shortcode will display a user profile editing form.

[ct-idx-pro-plus-profile]

The plugin automatically generates a URL (/my/profile) for this view, so you don’t need to create a page manually. However, a shortcode is available if you prefer to set up a custom page with this feature.

Recently Viewed

This shortcode will display a logged-in user’s recently viewed listings.

[ct-idx-pro-plus-recently-viewed]

The plugin automatically generates a URL (/my/recently-viewed) for this view, so you don’t need to create a page manually. However, a shortcode is available if you prefer to set up a custom page with this feature.

Favorite Listings

This shortcode will display a logged-in user’s favorite listings.

[ct-idx-pro-plus-favorite-listings]

The plugin automatically generates a URL (/my/favorite-listings) for this view, so you don’t need to create a page manually. However, a shortcode is available if you prefer to set up a custom page with this feature.

Saved Searches & Alerts

This shortcode will display a logged-in user’s saved searches with options for email and SMS alerts.

[ct-idx-pro-plus-saved-searches]

The plugin automatically generates a URL (/my/saved-searches) for this view, so you don’t need to create a page manually. However, a shortcode is available if you prefer to set up a custom page with this feature.

CT IDX Listings Search

This shortcode enables you to choose from a Single Field (with typeahead) or Multi (typeahead, price, beds, baths, property type, more…).

[ct_idx_pro_listings_search display_type="single"]

display_type

Determines the layout and fields available in the search form.
  • multiple (default): Displays a full search form with all available fields.
  • single: Displays a simplified search form with essential fields only.

CT IDX Listings Grid

This shortcode enables you to display a grid of listings based on your chosen parameters.

[ct_idx_pro_listings_grid property_types="single" min_price="500000" city="la-jolla"]

Common Parameters for Listings Grid:

The following parameters can be used to customize the display of listings in grid format:

  • Basic Filters
    • number="12": Number of listings to display (1-250).
    • sort="-list_date": Sorting options: -list_date (newest), +list_date (oldest), -price (highest), +price (lowest).
    • agent_id="": Filter by agent license number (requires office UID below to work)
    • listing_office_uid="": Filter by specific office UID.
    • mlses="": Filter by MLS numbers.
    • mls_listings="": Comma-separated list of specific MLS listing numbers.
  • Price Filters
    • min_price="250000": Minimum price (no currency symbols or separators).
    • max_price="950000": Maximum price (no currency symbols or separators).
  • Property Characteristics
    • min_bedrooms="3": Minimum number of bedrooms.
    • min_bathrooms="2": Minimum number of bathrooms.
    • min_sq_ft="1500": Minimum square footage.
    • max_sq_ft="3000": Maximum square footage.
    • min_lot_size="0.25": Minimum lot size in acres.
    • max_lot_size="1": Maximum lot size in acres.
    • min_year_built="2019": Minimum year built.
    • max_year_built="2025": Maximum year built.
    • text="pool, waterfront": Keywords comma separated, e.g., pool, waterfront, fireplace, etc…
  • Property Types and Status
    • statuses="active,pending,backup,coming-soon,sold,rented": Comma-separated list of statuses. (NOTE: coming-soon and sold cannot be called together)
    • property_types="single,condo,townhouse": Comma-separated list of property types (see full list below).
  • Location Filters
    • state="CA": State abbreviation.
    • city="San Diego": City name.
    • zip="92101,92065": Comma-separated zip codes.
    • subdivisions="Desert Princess,Royal Palms": Comma-separated subdivision names.
    • neighborhood_name="Downtown": Neighborhood name.

Available Property Types:

  • single (Single Family Home)
  • condo (Condo)
  • townhouse (Townhouse)
  • duplex (Duplex)
  • triplex (Triplex)
  • multi (Multi-Family)
  • mobile (Mobile/Manufactured)
  • ranch (Ranch)
  • land (Land)
  • commercial (Commercial)
  • lease (Lease)
  • other (Other)

Notes:

  1. Optional Parameters: All parameters are optional, and the default sorting is by newest listings first (-list_date).
  2. Price Values: Use plain numbers without currency symbols or separators.
  3. Comma-Separated Values: For fields like property_types and statuses, separate multiple values with commas.

This shortcode enables you to display a carousel of listings based on your chosen parameters.

[ct_idx_pro_listings_carousel property_types="single" min_price="500000" city="la-jolla" link_label="View More" link_url="/property-search/listings/" link_url_is_external="false"]

The Listings Carousel supports all filtering parameters listed above for Listings Grid with a recommended limit of 12 listings for optimal display.

CT IDX Listings Map

This shortcode enables you to display a map of listings based on your chosen parameters.

[ct_idx_pro_listings_map property_types="single" min_price="500000" city="la-jolla" height="500"]

Common Parameters for Listings Map:

All filtering parameters listed above for Listings Grid are supported by the Listings Map shortcode. Note the following maximum limits for the number parameter:

  • Map Display: Up to 250 listings.

CT IDX Listings Counter

This shortcode enables you to display a live, animated counter of listings based on any IDX filters. Great for highlighting inventory counts or encouraging clicks to filtered search results.

[ct_idx_pro_listings_counter city="San Diego" min_price="750000" suffix_text=" luxury homes available"]

Common Parameters for Listings Counter:

  • Basic Display
    • prefix_text="Currently": Text shown before the number.
    • suffix_text=" homes available": Text shown after the number.
    • animation_duration="2000": Time in milliseconds for the counter animation (default 2000).
    • show_comma_separator="true": Adds comma formatting to large numbers.
  • Link Options
    • link_url="/property-search/listings/": Makes the counter clickable.
    • link_hover_effect="scale": Hover effect (options: none, fade, scale, underline).
  • Style Options
    • number_color="#e74c3c": Color of the number.
    • number_font_size="60px": Font size of the number.
    • prefix_color="#2c3e50": Color of the prefix text.
    • prefix_font_size="18px": Font size of the prefix text.
    • suffix_color="#2c3e50": Color of the suffix text.
    • suffix_font_size="16px": Font size of the suffix text.
    • text_spacing="15px": Spacing between prefix, number, and suffix.
  • The Listings Counter supports all filtering parameters listed above for Listings Grid

Example Usage:

[ct_idx_pro_listings_counter 
  prefix_text="We have" 
  suffix_text=" luxury homes available" 
  city="Los Angeles" 
  min_price="1000000"
  property_types="single,luxury"
  statuses="active"
  number_color="#cc0000"
  prefix_font_size="20px"
  number_font_size="72px"
  suffix_font_size="18px"
  link_url="/luxury-homes/"
  link_hover_effect="fade"
]

CT IDX Item Grids

This shortcode enables you to create visually appealing grids showcasing neighborhood or property-type data from the MLS. You can choose from layout options such as 2, 3, 4, 6, and 8. Additionally, it offers the functionality to upload background images for these grids.

[ct_idx_pro_items_grid]
[
  {
    "state": "CA",
    "city": "San Diego",
    "neighborhood_name": "",
    "heading": "Downtown San Diego",
    "image": "https://example.com/downtown.jpg",
    "link": "/property-search/listings/?zip=92101&status=active"
  },
  {
    "state": "CA",
    "city": "La Jolla",
    "neighborhood_name": "",
    "heading": "La Jolla",
    "image": "https://example.com/la-jolla.jpg",
    "link": "/property-search/listings/?zip=92037&status=active"
  }
]
[/ct_idx_pro_items_grid]

Location Parameters

Each item in the grid can have the following location parameters:

  • state="CA": The state abbreviation for this grid item.
  • city="San Diego": The city name for this grid item.
  • zip="92101,92065": ZIP code(s) for this grid item. Multiple ZIP codes should be comma-separated.
  • neighborhood_name="Downtown": Neighborhood name for this grid item.
  • subdivisions="Desert Princess,Royal Palms": Subdivision names for this grid item. Multiple subdivisions should be comma-separated.

Display Parameters

Each item in the grid can have the following display parameters:

  • heading="Downtown San Diego": Custom heading for the grid item.
  • image="https://example.com/downtown.jpg": URL of the image to display for this grid item.

Login/Register Modal

To trigger the “Login/Register Modal” on your site, attach the class “login-register” to any element, like a button or link. Clicking that element will pop up the modal, enabling users to access login & registration forms directly on the current page.

login-register

Example:

<span class="btn login-register">Login/Register</span>

Sharing Search URLs with Leads

Sharing custom search URLs allows you to provide leads with tailored property listings based on their preferences. Follow these simple steps to create and share these personalized links.

  1. Initiate a Search: Go to YourDomainHere.com/property-search/listings/
  2. Configure Search Parameters: Use the provided fields to customize the search according to your lead’s specific needs and preferences.
  3. Click Search: Click the button with the magnifying icon.
  4. Copy that URL: Copy the URL directly from the address bar.
  5. Share that URL: Via email, social media, messaging apps, etc…

Tip: To share custom-drawn areas with your leads, start by searching and using the draw function. Afterward, simply copy the URL and share it with them.

Creating New Listing Alerts for Leads

For real estate professionals looking to maximize their efficiency, setting up lead alerts can significantly enhance your responsiveness to market changes and client interests.

  1. Create a New Lead: Go to your WordPress Admin > Users > Add New User > Enter their information, select the role “Buyer” > click Add New User
  2. Initiate a Search: While you’re logged in go to YourDomainHere.com/property-search/listings/
  3. Configure Search Parameters: Utilize the available fields to tailor the search according to your lead’s specific needs and preferences.
  4. Click Search: Click the button with the magnifying icon
  5. Save the Search: Once the desired parameters are set, click “Save Search”
  6. Assign the Search to Your Lead: Go to YourDomainHere.com/my/saved-searches/ and assign it to your lead.

If you’re running our CRM (Contempo Leads Pro) plugin you can also create a new lead in YourDomainHere.com/leads-pro/#/leads > Actions > Add New.

Off-Market & Pocket Listings

Off-market and pocket listings offer unique opportunities for showcasing properties outside the conventional MLS listings. With the Real Estate 7 theme, you have the flexibility to manually enter these listings directly into your website’s backend admin. Detailed guidance on adding and managing these listings can be found here.

In addition to manual entry, you also have the option to import listings via CSV for added convenience. Our integration with WP All Import simplifies this process, allowing you to efficiently manage your property listings. Learn more about this feature here.

Furthermore, if you’re utilizing our Real Estate 7 theme, you can access our innovative Single Listing Builder. This powerful tool enables you to create custom templates for pocket listings or exclusive properties. It’s an excellent way to highlight unique properties for prospective buyers or offer an exclusive marketing service to your sellers.

Off-market and pocket listings are not displayed in the IDX listings search. However, you can showcase them on your static pages using the Elementor widgets available in Real Estate 7.

Common Issues & Fixes

If your website fails to display data or encounters other problems, they often stem from several typical issues. Fortunately, these can be quickly identified and resolved. Below, we outline the most frequent problems and their solutions:

  1. Invalid IDX License Key: This issue often occurs after moving your website from a development to a live domain, requiring an update of your license key. For instructions on how to refresh your IDX License Key, visit How do I update my CT IDX Pro+ license key?
  2. API Requests Blocked by Bot Protection: If API requests are being blocked by your hosting provider’s bot protection or firewall, contact your host and ask them to whitelist both IP addresses below, along with the contempothemes.com domain:
    IPv4: 167.99.109.13
    IPv6: 2600:3c02::f03c:93ff:fea4:d2ac
    Some hosting providers only support IPv4 whitelisting, so it’s important that both addresses are allowed.
  3. Server Caching & JavaScript Minification: This issue occurs when your server caching > JavaScript minification settings are enabled. These settings can interfere with the proper functioning of dynamic content and scripts. Disable JavaScript minification in your caching plugin or server settings to resolve this.
  4. Office Only Data Enabled: If searches on your site are returning no data, it may be because the “Show Only Office Listings in Search Results” option is enabled in your settings. This setting restricts search results to listings from your office only. If your office currently has no listings, searches will appear as though there’s an issue. To display broader search results, navigate to Settings > CT IDX Pro+ > Search, and turn off the “Show Only Office Listings in Search Results” option.
  5. Unexpected Redirects: This can occur if your website has pages named or beginning with “listings,” leading to URL conflicts. To fix this, head over to your WordPress Admin area, then to the Pages section, and change the names of these pages to “properties” or something similar that works for you.
  6. My custom Elementor Pro Header & Footer is not showing: This is a quick fix, that requires two new pages to be created.
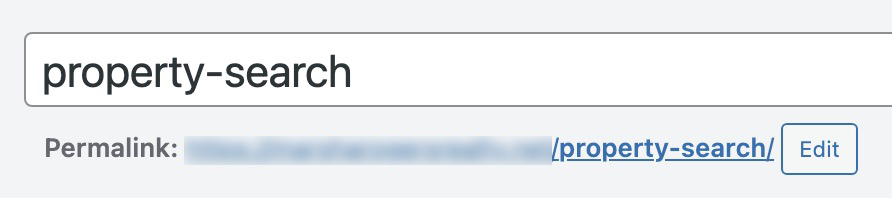
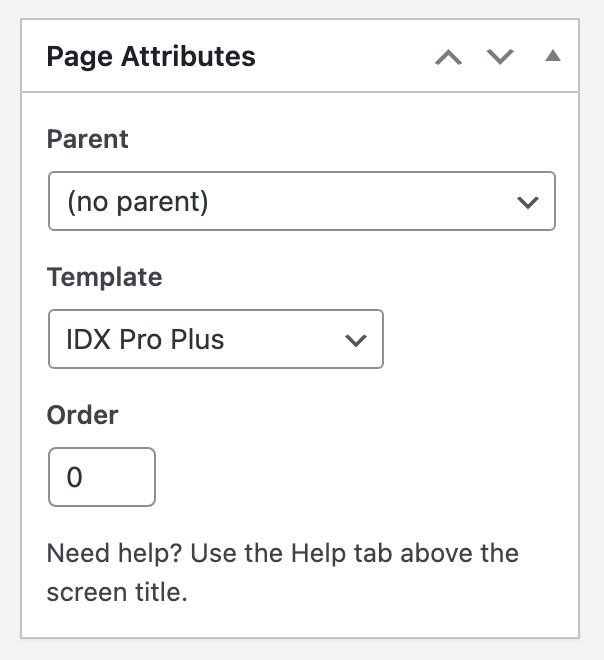
    Go to your WordPress Admin > Pages > Add New Page > name it “property-search”, slug is also “property-search” (screenshot) > apply the IDX Pro Plus page template (screenshot) > Publish
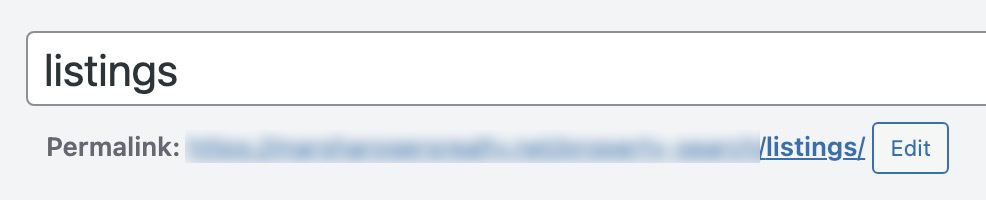
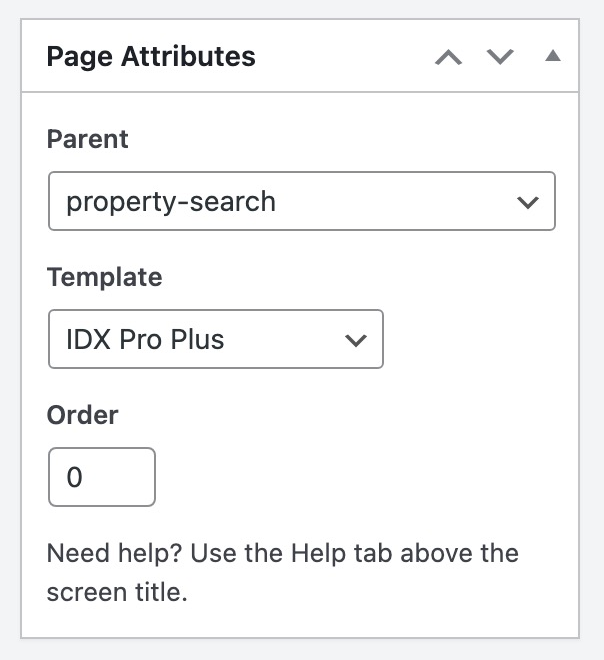
    Create another new page, name it “listings”, slug is also “listings” (screenshot) > set its parent as “property-search” (screenshot) > apply the IDX Pro Plus page template (screenshot) > Publish
  7. Listings Search or Map View Not Working with Custom Header:
    If your listings search or map view appears misaligned or non-functional, it could be that the plugin is not recognizing your custom header element (used for calculating scroll offsets). You can manually define the header selector with the following filter:

    add_filter('ct_idx_pro/header_selector', function() {
        return '#site-navigation'; // Replace with your custom header ID or class
    });

    Apply this to your theme’s functions.php file or a custom plugin. Be sure to use the correct selector that matches your site’s header element.

Best Practices & Strategy Guides

Make the most of your IDX plugin and drive more qualified leads by implementing smart design and marketing strategies. These guides from our Real Estate 7 Resource Blog offer actionable steps and real-world examples to improve your real estate website.

IDX Landing Pages

How to Create IDX Landing Pages That Convert (Templates + Examples)

Learn how to build high-performing IDX landing pages that generate clicks and conversions. Includes layout ideas, keyword tips, and ready-to-use templates.

City & Neighborhood Pages

How to Build City-Specific Landing Pages for Real Estate

Guide to creating geo-targeted pages that rank in local search and drive organic traffic.

Best Practices for Designing Real Estate Neighborhood Pages

Tips for structuring content, maps, and listings for neighborhood pages that both users and search engines love.

Lead Capture & CTAs

How to Design CTAs for Real Estate Listings

Explore call-to-action placements and wording strategies that boost engagement and lead conversions on listing pages.

Content Strategy

One‑Weekend Content Sprint: 10 Local Pages You Can Publish Fast

Follow this rapid content strategy to create 10 locally targeted pages, such as cost of living, new construction, etc, that are optimized for SEO and designed to convert with CT IDX Pro+ widget integration.

Real Estate Listing Launch System: 7‑Day Plan (Templates Included)

Discover a complete 7-day listing launch system to generate buzz, drive showings, and capture leads efficiently. Includes daily tasks, customizable templates for email, social, and SMS, plus guidance on using CT IDX Pro+ to create property pages and manage the launch.

Real Estate Website Structure Blueprint: Slugs, Hubs & Internal Links

Learn how to structure your site using SEO‑friendly slugs, logical content hubs, and smart internal linking to improve navigation, search rankings, and conversion—backed by real estate sites seeing up to a 40% increase in leads. CT IDX Pro+ fits seamlessly here when building hub or listing pages.

Turn Your CT IDX Pro+ Listings Into 24/7 AI-Powered Conversations

Now that CT IDX Pro+ is live, you can connect it with ChatSpark to transform your MLS listings into intelligent, always-on conversations that capture and qualify leads automatically.

What this unlocks for your website:

  • Real-time listing answers — Visitors can ask about pricing, features, photos, availability, and property details pulled directly from your CT IDX Pro+ MLS data.
  • “Ask AI” buttons across property cards — Add instant entry points on property cards and detail pages so prospects can ask questions without hunting for a contact form.
  • Lead capture with full context — Collect name, email, phone, timeframe, plus the full conversation and specific listing interest.
  • Works 24/7 across channels — Deploy on your website and social messaging platforms so you never miss after-hours inquiries.

How CT IDX Pro+ & ChatSpark Work Together

ChatSpark connects directly to your CT IDX Pro+ listings using an AI Action built specifically for real estate agents. When a visitor asks about a property, the AI responds with real-time MLS data. When the visitor shows buying intent, it captures their details and passes the qualified lead into your workflow with full property-level context.

This transforms your CT IDX Pro+ listings, across search pages, property detail pages, property cards, and widgets, from passive browsing into an active, AI-driven lead generation system.

See It in Action

Learn how ChatSpark connects with CT IDX Pro+, view the demo, and explore pricing for real estate agents here:

https://chatspark.io/solutions/real-estate-agents